
How to Convert PNG to JPG in PowerPoint (Step-by-Step)
How to Convert PNG to JPG in PowerPoint (Step-by-Step)
Home » Articles » Pictures, Icons, Videos, Etc. » How to Convert PNG to JPG in PowerPoint (Step-by-Step)
Have you ever wondered how do I convert a PNG to JPG for free inside of PowerPoint?
In this article, you’ll learn two different ways to use Microsoft PowerPoint as a PNG to JPG converter (or vice versa). The key points when converting your images like this in PowerPoint are:
File size: Do you want your image to be automatically compressed?
Location: Where do you want to use your image
On top of that, you can use these techniques to convert any type of content in your PowerPoint presentations (graphics, tables, charts, etc.) into either a PNG or JPG image.
This is extremely useful when you need to paste your graphs (as images) into other document like Microsoft Word.
NOTE: A JPG image and a JPEG image are one in the same thing. The shorter JPG name is a throwback to earlier versions of Windows when you could only have three characters in the name instead of four.
PNG to JPG: Save As Picture
This technique converts your PNG image into a JPG AND saves it to your computer so that you can use it in other programs.
And as I’ll show you below, if you know where to click, you can choose to either to compress or not compress the image (it’s sneaky).
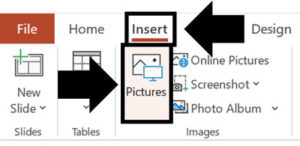
1. Insert a PNG image into PowerPoint
Click the Insert tab, then choose the Pictures command.
Inside the dialog box, find your image and insert it into PowerPoint. PowerPoint can only convert images that are already within your presentation. It cannot externally convert your pictures.
2. Right-Click your image and select Save As Picture
Right-click your PNG image and select Save as Picture to open the Save As Picture dialog box.
3. Change your Save As Type to JPEG
Inside the Save As Picture dialog box, open the Save As Type drop down and choose the JPEG File Interchange Format (the same as JPG). Inside the dialog box, you can also:
- Choose where to save your image on your computer (so it’s easier to find)
- Rename your image (if necessary)
4. Choose the size of your image
When you are ready to save your PNG image as a JPG, open the Save drop down and choose one of the following options:
A. Save
The Save option saves AND compresses your image as a JPEG.
Just keep in mind that this not only compresses your image to less than the Print (220 ppi), it also removes any areas you’ve cropped out of your photo in PowerPoint.
B. Save Original Picture
This option saves (but does not compress) your image as a JPG on your computer.
In addition, assuming you haven’t cropped and compressed your image, any cropped areas are restored to your image. That’s because when you crop images in PowerPoint, the cropped areas remain with your photo until you specifically compress and remove them.
To learn everything about compressing images in PowerPoint (and what the different options mean), read our guide here.
PNG to JPG: Paste Special
This Paste Special technique works best when converting PNG to JPG within your current PowerPoint presentation.
Just beware that this technique AUTOMATICALLY compresses your images to either the Web (150 ppi) or E-mail (90 ppi) file size.
PowerPoint does this automatically, and there is no way to avoid it. So if you DO NOT want your JPG image compressed, you have to use the Save As Picture technique mentioned above.
1. Copy or Cut your PowerPoint image
Select your image in PowerPoint that you want to convert to the JPG file type and either:
- Ctrl + C to copy the image
- Ctrl + X to Cut the image
You can use this same technique to turn anything in your PowerPoint presentation into a PNG or JPG image.
2. Open the Paste Special Dialog box
Navigate to where you want your JPG image in PowerPoint (it could also be a Word or Excel document too) and open the Paste Special dialog box.
- Navigate to the Home tab
- Open the Paste drop down
- Select Paste Special
You can also use the keyboard shortcut Ctrl + Alt + V to open the Paste Special dialog box.
To learn more PowerPoint shortcuts to fast track everything you do in PowerPoint, read our shortcut guide here.
3. Choose Picture (JPEG)
Inside the Paste Special dialog box:
- Select Picture (JPEG)
- Click OK
In the same way, you can turn anything you’ve copied or cut in PowerPoint into a JPEG, PNG or other image file type in PowerPoint.
Just beware that the Paste Special dialog box AUTOMATICALLY compresses your image to either the Web (150 ppi) or E-mail (90 ppi) compression type.
To learn everything you need to know about compressing images in PowerPoint to reduce your PowerPoint file size, read our guide here.
Why convert PNG to JPG for your PowerPoint presentations?
The biggest reason to convert PNG images into the JPG format in PowerPoint is to reduce your presentation’s file size.
PNG images are often five to 10 times larger than their JPG equivalents. This is true even if you compress your PNG images inside of PowerPoint.
As such, converting your PNG images to the JPG format is a fast easy way to reduce your PowerPoint file size. Just be aware that you will lose some image quality.
When should you NOT convert PNG to JPG in PowerPoint?
When building a PowerPoint template, it’s best to use PNG images on your Slide Master.
Although the PNG images are larger, they retain their quality better than their JPG equivalents. That’s because every time you save your presentation, PowerPoint compress your JPG images more and more.
This is why if you have an old presentation that you have been using for years, your logo might appear grainy. Someone used a JPG image of your logo on the slide master, and PowerPoint has slowly compressed it over the years.
For help thinking through and building your own PowerPoint template, read our guide here.
FREE COURSE
Your PowerPoint Misery Ends Here!
Sign up now to see how 4 little-known secrets are turning peoples’ PowerPoint headaches into high-fives… and saving them at least 40 hours each year.
You'll also get our newsletter with the best PPT tips on the web, which you can unsubscribe from with one click.


